Indoor retrobriting is an alternative to conventional outdoor retrobriting. It does offer some advantages over the conventional technique but also some inconvenients. The chief advantages are as follows:
- It can obviously be performed at any time of the day or night as it does not require sunny conditions
- The retrobriting gel does not dry as quickly and therefore requires less applications
- There are less debris in its environment which would otherwise lead to insects and/or vegetation (leaves, grasses, etc.) sticking to the gel
- It is a more ‘gentle’ form of retrobriting (even with 40 volume gel) that is therefore more forgiving specifically on platinum-colored plastics
The main disadvantages of this technique compared to conventional retrobriting are:
- It requires the purchase of additional equipment (e.g. blacklights)
- The overall process takes longer
Recommendations regarding the setup/technique:
- UV lights should be positioned in such a way that they distribute light evenly on all plastics. In my case I use two (2) American Dj 24″ Black Light Fixtures (see image below) mounted on a wooden frame above the plastics to be treated. As I position the plastic parts underneath those lights, I make sure that all sides are properly exposed and that shadows are minimized. Note that repositioning may be required every few hours if an even distribution of UV light is not possible.

- I remove all logos and when possible labels as well, from plastic cases. I then clean all plastic parts thoroughly with Chlorox CleanUp and a nail brush.
- I use an out-of-the-bottle 40 Volume peroxide gel from Salon Creme (see link below). This can be found in stores such as Sally Beauty or on Amazon. I use a paint brush to apply thin layers of the gel evenly on all plastics. The key here is to avoid pooling or uneven distribution of the gel. (http://www.sallybeauty.com/creme-developer/SBS-760680,default,pd.html)
- I reapply the gel every few hours if necessary
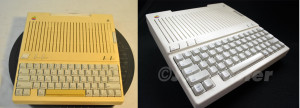
The length of the process will be a function of the yellowing of the plastics and of the desired result. It is my experience that significantly yellowed plastics may require 10 to 20 hours of exposure to obtain perfect results.
 There are many ways to Retrobrite. I avoid submerging because it’s a waste of peroxide, and maybe toxic for the environment, also don’t wrap in plastic as it allows areas to wrinkle and get more concentrated than others, promoting streaks. I basically paint the gel to the plastic.