Installing a parallel CR2032 battery on a vintage Dallas-based No-Slot Clock
Author: David Laffineuse, April 2016
davidlaffineuse@me.com
Introduction
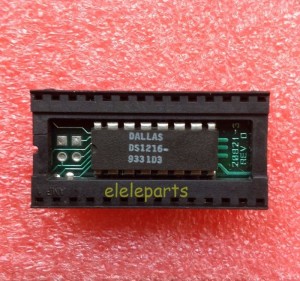
The original 28-pin no-slot clocks (NSC) based on the Dallas Smartwatch DS1216E, henceforth referred to as the “vintage NSCs”, contain an embedded lithium battery (see Figure 1). Those batteries are not replaceable and, given their 10 year expected lifespan, are by now often completely drained. In many cases this is the case for many of the new old stock (NOS) found on eBay from Chinese suppliers. I have personally purchased four Eleleparts on eBay and all four units were dead on arrival (DOA). This poses a challenge for those of us who would like a cheap solution for their Apple II to keep track of time or time-stamp documents and files.
Figure 1 (below): vintage NSC (new old stock) typically sold on eBay for less than $6/unit
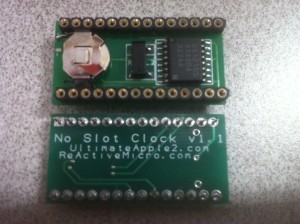
At this point the only readily available NSC alternative is the redesigned NSC sold by Ultimate Micro (www.ultimateapple2.com). This device, sold for $45/unit as of April 2016, is a brand new device that features a replaceable lithium battery (see Figure 2). The Ultimate Micro also has a thinner profile than the vintage NSCs which will fit in an Apple IIc or IIc Plus even when a memory expansion card is installed. This is by far the best NSC on the market.
Figure 2 (below): NSC sold by Ultimate Micro
In my experience the NSC sold by Ultimate Micro is also the only NSC that will fit the Apple IIc A2S4000 because the thick plastic frame, which is attached the keyboard on those models, does not leave sufficient clearance for the vintage NSCs (unless of course it is removed). I also confirm that in the presence of a memory expansion card, the Ultimate Micro NSC is the only solution. This even though the NSC’s thickness still causes it to push the memory expansion card to the point that the standoffs can no longer be used. The contact between the NSC and the memory expansion card doesn’t appear to affect operations however and the keyboard still fits properly on top.
At $45/unit the Ultimate Micro model, although superior to all other NSC options, is still relatively pricey. This may motivate some collectors, including myself, to try to salvage a vintage NSC by connecting it to an external power source. This solution has been documented in the a thread on the internet and I have attempted it on one of the DOA Chinese NSCs that I bought on eBay.
Vintage NSC Parallel Battery Installation Process:
The process is relatively simple and only requires two soldering points.
Tools/supplies required:
- 30 AWG wrapping wire
- One new 3-volt CR2032 cell battery
- One CR2032 cell battery adapter (Button Battery Holder)
- One 28-pin no-slot clocks (NSC) based on the Dallas Smartwatch DS1216E
- Soldering iron and solder
- Small piece of two-sided adhesive foam tape
- NSC software v1.4 (https://ultimateapple2.com/forums/forum/main-forum/no-slot-clock-goes-under-the-ram-chip/250-no-slot-clock-software)
Process:
- Cut two six-inch segments (or longer depending on where you are planning to eventually install the battery holder) of the wrapping wire
- Strip 2 millimeters at each end of the wire segments
Figure 3 (below): Dallas DS1216 pin assignments
- Solder one end of one wire to the shoulder of pin 8 (GND or ground) of the Dallas DS1216 chip and the other end of that wire to the negative pin of the CR2032 adapter (see Figures 3 and 4)
- Solder one end of the other wire to the shoulder of pin 14 (BAT2 or Battery 2 input) of the Dallas DS1216 chip and the other end of that wire to the positive pin of the CR2032 adapter (see Figures 3 and 4)
- Install the CR2032 battery in its adapter
- Install the NSC in your Apple II according to the NSC installation instructions (see sources at the end of this document for a link)
- Using a small piece of two-sided foam tape, position your CR2032 adapter away from the motherboard, in an area that will not interfere with the closing of the case. (see Figure 5)
- Set the date and time using the NSC Utilities disk v1.4
- Exit the NSC Utility program
Figure 4 (below): Soldering on pin shoulders (2 examples)

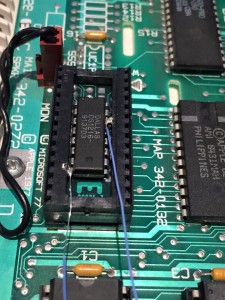
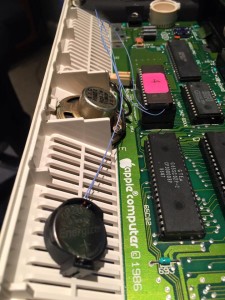
Figure 5 (below): NSC with parallel battery installed in an Apple IIc A2S4100
Test:
In order to verify that the parallel battery installation has been successful, follow these steps:
- One the date and time have been set with the NSC utility program, exit the program, and turn off your Apple II
- Wait 10 minutes
- Turn on your Apple II and boot from the NSC Utility disk.
- Verify that the current date and time reported by the NSC Utility program are still correct
Potential Improvements:
In conversations on this topic with other Apple II Enthusiasts on Facebook, participants indicated that running current from the new CR2032 though the old embedded internal battery may be problematic and may eventually lead to membrane degradation of the old battery and a short. According to the DS1215 datasheet, pin 4 and pin 14 are the battery pins. If pin 14 isn’t being used it should be tied to GND. The recommendation here would therefore be to cut both pins 4 and 14 and tying pin 14 to GND and connecting pin 4 to the CR2032. When cutting pin 4, one should be careful to leave enough pin shoulder to still be able to solder a wire to it to connect it to the battery.
Note that I have not been able to find the proper tool to cut the DS1216 pins and I have therefore not implemented those improvements.
Sources:
- Conversations on the Facebook group “Apple II Enthusiasts” on this topic.
- Write up on the site vintage-radio.net by ‘glowinganode” from April 2009 (http://www.vintage-radio.net/forum/showthread.php?t=120088).
- Dallas DS1215 datasheet (http://pdf1.alldatasheet.com/datasheet-pdf/view/58438/DALLAS/DS1215.html)
- NSC Installation Instructions from Ultimate Micro (https://ultimateapple2.com/forums/forum/main-forum/no-slot-clock-goes-under-the-ram-chip)