Apple IIc ROM upgrade
Installation Procedure
Please make sure you have a clean, dry, soft surface to work on to avoid damage to the top of the Apple IIc case.
1. Turn off the power to the Apple IIc.
2. Disconnect the power cord and connections for any attached peripherals.
Note: For step by step instructions on removing the back panel, top cover and keyboard, refer to your Service Program Manual, Apple IIc Technical Procedures, Take-apart section.
3. Turn the computer over (upside down) on a clean, soft surface.
4. Remove the six screws accessible from the bottom side of the Apple IIc as shown in Figure 1.

5. Turn the Apple IIc over (upright).
6. Remove the back panel.
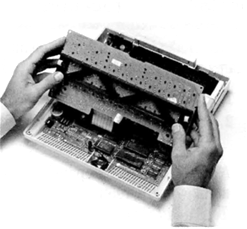
7. Remove the top cover carefully.
8. Slide the keyboard forward from the disk drive shield, being careful of the RFI/EMC clips. Flip the keyboard over and place it on top of the internal disk drive.
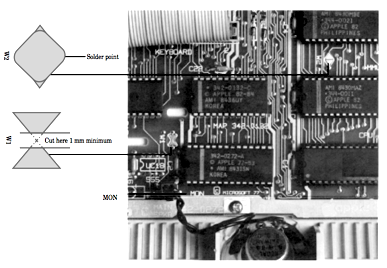
9. Locate W1 on the main logic board and cut through the join point of the two triangles, as shown in Figure 3.
Locate the two triangles designated as W2 and connect them with a soldering iron using a small drop of solder, as shown in Figure 3.
Locate the 28-pin I.C. designated as MON (in Figure 3) at location D19 on the printed circuit board.
Carefully remove the MON IC. using the I.C. extractor and replace it with the new ROM. Make sure that pin 1 is oriented correctly by lining up the notch on the end of the I.C. with the end of the socket with the white dot. Make sure all pins are aligned with holes in the socket before applying pressure.
13. Return the keyboard and the handle to their original positions and replace the top cover.
14. Turn the Apple IIc over carefully (upside down).
15. Secure the top cover with the six screws removed at step 4.
16. Attach the back panel.
17. Turn the Apple IIc upright again.
18. Install the upgrade sticker on the back panel of the machine to the left of the disk drive icon.
19. Plug the power cord into the power socket and reconnect all other peripherals.
20. Run the Apple IIc Dealer Diagnostics, Rev. C to make sure the computer operates correctly. Refer to your Service Program Manual, Apple IIc Technical Procedures for detailed instructions.
21. Return Add-on Kit manuals to customer with the computer.